Showing posts with label Howto's. Show all posts
Showing posts with label Howto's. Show all posts
Wednesday, December 19
Mounting Floppy Disks and Removable Media
In order to read floppy disks and other removable media, you need to mount the device. Linux usually adds the proper settings to /etc/fstab and default mount points to the /mnt directory.
The defaul mount points are straightforward; for example, floppy are mounted on /mnt/floppy, CD's are mounted on /mnt/cdrom. You can do this using the following command:
#mount -t vfat /dev/fd0 /mnt/floppy
the -t switch specifies the type of filesystem(vfat). The device file /dev/fd0 represents the first floppy drive; /mnt/floppy is the directory through which you can access the files after mounting.
If you take a look at your /etc/fstab entry and you will see something like the ff:
/dev/fd0 /mnt/floppy auto noauto,owner,kudzu 0 0
This /etc/fstab line sets the default configuration for he first floppy drive (/dev/fd0). The ormat is auto which means that the mount command searches the filesystems and so all you need to mount the floppy is he following command:
#mount /dev/fd0 /mnt/floppy
Similarly, the device for your CD-ROM is normally /dev/cdrom. To mount an ISO9660 CD-ROM, run he command:
#mount -rt iso9660 /dev/cdrom /mnt/cdrom
Now you can read he contents of /mnt/cdrom or /mnt/floppy as if it were a normal filesystem on your system. You don't have to use /mnt/floppy or /mnt/cdrom directories rather you can use any available empty directory of your choice.
You can add the cd-rom entry on your /etc/fstab config file just like this:
/dev/cdrom /mnt/cdrom udf,iso9660 noauto,owner,kudzu,ro 0 0
Asyou can see, iso9660 is already specified as the default CD filesystem and CD's are mounted as read-only(ro) by default. Therefore, all you need to command in mounting the CD is either one of the following:
#mount /mnt/cdrom
#mount /dev/cdrom
To unmount floppy or cdrom, use the umount command:
#umount /mnt/floppy
#umount /mnt/cdrom
Take note that it is imprtant to unmount floppy disk before removing them. Otherwise, you may lose the data which might still be in he cache.


Tuesday, December 18
Restricting User's Login
When we talk about forcing a user to log off, what we’re really talking about is time restrictions on certain account system access and services. The easiest way I’ve found to implement time restrictions is by using software called Linux-PAM.
Pluggable Authentication Module (PAM) is a mechanism for authenticating users. Specifically, we’re going to use the pam_time module to control timed access for users to services.
Using the pam_time module, we can set access restrictions to a system and/or specific applications at various times of the day as well as on specific days. Depending on the configuration, you can use this module to deny access to individual users based on their name, the time of day, the day of week, the service they’re applying for, and their terminal from which they’re making the request.
When using pam_time, you must terminate the syntax or rule in the /etc/security/time.conf file with a newline.
Always remeber that pound sign [#] is a comment and the system will ignore that text inline to it.
This is an example configuration file for the pam_time module.
Its syntax was initially based heavily on that of the shadow package (shadow-960129).
The syntax of the lines is as follows:
services;ttys;users;times
- The first field — services = list of PAM service names.
- The second field — tty =logic list of terminal names.
- The third field — user = is a logic list of users or a netgroup of users.
- The fourth field — times =indicates the applicable times.
Here’s an example of a typical set of rules:
login ; * ; !ron ; MoTuWeThFr0800-2000
login ; * ; !root ; !Al0000-2400
http ; * ; !ron ; MoTuWeThFr0800-2000
http ; * ; !root; !Al0000-2400
ftp ; * ; !ron ; MoTuWeThFr0800-2000
ftp ; * ; !root; !Al0000-2400

These rules restrict user ron from logging on between the hours of 0800 and 2000, and they also restrict http and ftp access during these hours.

Root would be able to logon at any time and browse the Internet during all times as well.
Thursday, November 29
Deleting a linux file with spaces
It is a common issue and can be found on many blogsites how to delete a file/s with spaces. But I want to share my own version. The solution for this problem is to use a quotation mark "" (quotes), backslash or the tab key.
Trying to create a file:
#touch filename test 1
# ls -al
total 24
drwxr-xr-x 2 root root 4096 Nov 29 23:17 .
drwxr-x--- 38 root root 16384 Nov 29 23:17 ..
-rw-r--r-- 1 root root 0 Nov 29 23:17 1
-rw-r--r-- 1 root root 0 Nov 29 23:17 filename
-rw-r--r-- 1 root root 0 Nov 29 23:17 test
Using quotes:
#touch "filename test 1"
#ls -al
total 24
drwxr-xr-x 2 root root 4096 Nov 29 23:20 .
drwxr-x--- 38 root root 16384 Nov 29 23:17 ..
-rw-r--r-- 1 root root 0 Nov 29 23:20 filename test 1
Listing file/s with spaces:
#ls -la filename test 1
ls: filename: No such file or directory
ls: test: No such file or directory
ls: 1: No such file or directory
Listing file/s with quotes and backslash:
#ls -la "filename test 1"
-rw-r--r-- 1 root root 0 Nov 29 23:20 filename test 1
or
# ls -la filename\ test\ 1
-rw-r--r-- 1 root root 0 Nov 29 23:20 filename test
or using the tab button
#ls -al filename
then hit TAB key and all filename* will show up and type the next character
Removing file without quotes
# rm filename test 1
rm: cannot lstat `filename': No such file or directory
rm: cannot lstat `test': No such file or directory
rm: cannot lstat `1': No such file or directory
Using quotes in removing file with spaces:
# rm "filename test 1"
rm: remove regular empty file `filename test 1'? y
Moving/ Renaming directory w/o quotes
# ls -la
total 28
drwxr-xr-x 3 root root 4096 Nov 29 23:32 .
drwxr-x--- 38 root root 16384 Nov 29 23:17 ..
drwxr-xr-x 2 root root 4096 Nov 29 23:29 folder test 1
Note: folder test 1 is a directory
#mv folder test 1 foldertest1
mv: target `foldertest1' is not a directory
Using quotes:
# mv "folder test 1" foldertest1
# ls -la
total 28
drwxr-xr-x 3 root root 4096 Nov 29 23:34 .
drwxr-x--- 38 root root 16384 Nov 29 23:17 ..
drwxr-xr-x 2 root root 4096 Nov 29 23:29 foldertest1
or Using the backslash
# mv folder\ test\ 2 foldertest2
# ls -la
total 28
drwxr-xr-x 3 root root 4096 Nov 29 23:36 .
drwxr-x--- 38 root root 16384 Nov 29 23:17 ..
drwxr-xr-x 2 root root 4096 Nov 29 23:29 foldertest2
Deleting directory with quotes
# rm -rf "folder test 2"
# ls -la
total 24
drwxr-xr-x 2 root root 4096 Nov 29 23:38 .
drwxr-x--- 38 root root 16384 Nov 29 23:17 ..
or Using backslash or tab key
Trying to create a file:
#touch filename test 1
# ls -al
total 24
drwxr-xr-x 2 root root 4096 Nov 29 23:17 .
drwxr-x--- 38 root root 16384 Nov 29 23:17 ..
-rw-r--r-- 1 root root 0 Nov 29 23:17 1
-rw-r--r-- 1 root root 0 Nov 29 23:17 filename
-rw-r--r-- 1 root root 0 Nov 29 23:17 test
Using quotes:
#touch "filename test 1"
#ls -al
total 24
drwxr-xr-x 2 root root 4096 Nov 29 23:20 .
drwxr-x--- 38 root root 16384 Nov 29 23:17 ..
-rw-r--r-- 1 root root 0 Nov 29 23:20 filename test 1
Listing file/s with spaces:
#ls -la filename test 1
ls: filename: No such file or directory
ls: test: No such file or directory
ls: 1: No such file or directory
Listing file/s with quotes and backslash:
#ls -la "filename test 1"
-rw-r--r-- 1 root root 0 Nov 29 23:20 filename test 1
or
# ls -la filename\ test\ 1
-rw-r--r-- 1 root root 0 Nov 29 23:20 filename test
or using the tab button
#ls -al filename
then hit TAB key and all filename* will show up and type the next character
Removing file without quotes
# rm filename test 1
rm: cannot lstat `filename': No such file or directory
rm: cannot lstat `test': No such file or directory
rm: cannot lstat `1': No such file or directory
Using quotes in removing file with spaces:
# rm "filename test 1"
rm: remove regular empty file `filename test 1'? y
Moving/ Renaming directory w/o quotes
# ls -la
total 28
drwxr-xr-x 3 root root 4096 Nov 29 23:32 .
drwxr-x--- 38 root root 16384 Nov 29 23:17 ..
drwxr-xr-x 2 root root 4096 Nov 29 23:29 folder test 1
Note: folder test 1 is a directory
#mv folder test 1 foldertest1
mv: target `foldertest1' is not a directory
Using quotes:
# mv "folder test 1" foldertest1
# ls -la
total 28
drwxr-xr-x 3 root root 4096 Nov 29 23:34 .
drwxr-x--- 38 root root 16384 Nov 29 23:17 ..
drwxr-xr-x 2 root root 4096 Nov 29 23:29 foldertest1
or Using the backslash
# mv folder\ test\ 2 foldertest2
# ls -la
total 28
drwxr-xr-x 3 root root 4096 Nov 29 23:36 .
drwxr-x--- 38 root root 16384 Nov 29 23:17 ..
drwxr-xr-x 2 root root 4096 Nov 29 23:29 foldertest2
Deleting directory with quotes
# rm -rf "folder test 2"
# ls -la
total 24
drwxr-xr-x 2 root root 4096 Nov 29 23:38 .
drwxr-x--- 38 root root 16384 Nov 29 23:17 ..
or Using backslash or tab key
Monday, November 12
SSH Howto Tips
**X Forwarding over SSH
To run GUI programs on one machine using another machine, We can use X forwarding by connecting using ssh -X user@remotecomputer and once logged in running the command to start the GUI app, the GUI window will open on the local machine. X11Forwarding must be enabled in the file /etc/ssh/sshd_config which is usually set by default.
To speed things up -Y (Trusted X11Forwarding) or -C (compression) can be used instead of -X.
X11Forwarding is also applicable accessing windows computer via linux system using rdesktop (remote desktop).
e.g. #ssh -Y user@remotehost rdesktop remotecomputer
where remotehost is a linux server and remotecomputer(windowsPC) can be access via linux server only.
**Automatic SSH login without password
SSH is a secure clone of RSH with RSA encryption based authentication. This article tells you how to use ssh without having to type in your password every time you use 'ssh'.
First, generate your public/private keys using ssh-keygen
#ssh-keygen - This will generate 'identity' and 'identity. pub' in the .ssh directory in your home directory.
#ssh-keygen -t rsa -This will generate 'id_rsa' and 'id_rsa.pub' in the .ssh directory in your home directory.
When asked, just press enter for safety. Goto directory where you generate your ssh key. Usually, ~user/.ssh/
Second, Copy the *.pub file to the .ssh directory of the remote host using scp command.
[root@ron .ssh]#scp filename.pub ron1@remotehost:/home/ron1/.ssh/
Under ron1:
#cd /home/ron1/.ssh
[root@ron1 .ssh]#touch authorized_keys
[root@ron1 .ssh]#cat filename.pub > authorized_keys
To append ssh key type:
(Use for setting up multiple access keys.)
[root@ron1 .ssh]#cat filename.pub >> authorized_keys
Finally, you can try ssh without entering password and Viola!
#ssh ron1@remotehost or simply
#ssh remotehost
**Runing Commands Over SSH
Sometimes you don't really want to run a shell like Bash on the host you are connecting to. Maybe you just want to run a command and exit. This is easy to accomplished by putting the command you wish to run at the end of your ssh connection command.
#ssh user@remotehost ls -l /home
#ssh user@remotehost less /etc/hosts.allow
**Keeping your SSH session alive
Keeping your SSH session up and idle is sometimes a problem. For whatever reason, the connection dies at X minutes of inactivity. Usually this happens because there is a firewall between you and the internet that is configured to only keep stateful connections.
Fortunately, in recent versions of OpenSSH, there is a fix for this problem. Simply put in your sshd_config file the following:
Host *
Protocol 2
TCPKeepAlive yes
ServerAliveInterval 60
**Allow only specific users to log in via SSH
You should not permit root logins via SSH, this is a big and unnecessary security risk. If an attacker gains root login for your system, he can do more damage than if he gains normal user login. Configure SSH server so that root user is not allowed to log in. Find the line that says:
PermitRootLogin yes
Change yes to no and restart the service. You can then log in with any defined user and switch to user root if you want to become a superuser.
It is wise to create a dummy local user with absolutely no rights on the system and use that user to login into SSH. That way no harm can be done if the user account is compromised. You can specify certain users who you want to have access by editing your sshd_config file.
At the end of sshd_config file I would add a line like this:
AllowUsers ron hannah jean
Allowing only specific hosts using tcp wrappers
You can allow only specific hosts on a network to be able to connect to your SSH service, but you don't want to use or mess up your iptables configuration. Instead, you can use TCP wrappers, in this case the sshd TCP wrapper.
By default TCP wrappers first look in the /etc/hosts.deny file to see what hosts are denied for what service. Next, TCP wrapper looks in /etc/hosts.allow file to see if there are any rules that would allow hosts to connect to a specific service. Edit your /etc/hosts.deny using your favorite editor. For me, I always use vi editor.
#vi /etc/hosts.deny
sshd: ALL
This means that by default all hosts are forbidden to access the SSH service. This needs to be here, otherwise all hosts would have access to the SSH service, since TCP wrappers first looks into hosts.deny file and if there is no rule regarding blocking SSH service, any host can connect.
Next, create a rule in /etc/hosts.allow to allow only specific hosts to use the SSH service. Let say, local subnet 192.168.1.0/24 or specific IP 192.100.1.2. Only hosts specified below can access the ssh service.
#vi /etc/hosts.allow then add:
sshd: 192.168.1 192.100.1.2
All other hosts are disconnected before they even get to the login prompt, and receive an error like this:
ssh_exchange_identification: Connection closed by remote host
@If you found this article informative, you may be interested on the black square window above related to this post. You can also leave comments or subscribe.
To run GUI programs on one machine using another machine, We can use X forwarding by connecting using ssh -X user@remotecomputer and once logged in running the command to start the GUI app, the GUI window will open on the local machine. X11Forwarding must be enabled in the file /etc/ssh/sshd_config which is usually set by default.
To speed things up -Y (Trusted X11Forwarding) or -C (compression) can be used instead of -X.
X11Forwarding is also applicable accessing windows computer via linux system using rdesktop (remote desktop).
e.g. #ssh -Y user@remotehost rdesktop remotecomputer
where remotehost is a linux server and remotecomputer(windowsPC) can be access via linux server only.
**Automatic SSH login without password
SSH is a secure clone of RSH with RSA encryption based authentication. This article tells you how to use ssh without having to type in your password every time you use 'ssh'.
First, generate your public/private keys using ssh-keygen
#ssh-keygen - This will generate 'identity' and 'identity. pub' in the .ssh directory in your home directory.
#ssh-keygen -t rsa -This will generate 'id_rsa' and 'id_rsa.pub' in the .ssh directory in your home directory.
When asked, just press enter for safety. Goto directory where you generate your ssh key. Usually, ~user/.ssh/
Second, Copy the *.pub file to the .ssh directory of the remote host using scp command.
[root@ron .ssh]#scp filename.pub ron1@remotehost:/home/ron1/.ssh/
Under ron1:
#cd /home/ron1/.ssh
[root@ron1 .ssh]#touch authorized_keys
[root@ron1 .ssh]#cat filename.pub > authorized_keys
To append ssh key type:
(Use for setting up multiple access keys.)
[root@ron1 .ssh]#cat filename.pub >> authorized_keys
Finally, you can try ssh without entering password and Viola!
#ssh ron1@remotehost or simply
#ssh remotehost
**Runing Commands Over SSH
Sometimes you don't really want to run a shell like Bash on the host you are connecting to. Maybe you just want to run a command and exit. This is easy to accomplished by putting the command you wish to run at the end of your ssh connection command.
#ssh user@remotehost ls -l /home
#ssh user@remotehost less /etc/hosts.allow
**Keeping your SSH session alive
Keeping your SSH session up and idle is sometimes a problem. For whatever reason, the connection dies at X minutes of inactivity. Usually this happens because there is a firewall between you and the internet that is configured to only keep stateful connections.
Fortunately, in recent versions of OpenSSH, there is a fix for this problem. Simply put in your sshd_config file the following:
Host *
Protocol 2
TCPKeepAlive yes
ServerAliveInterval 60
**Allow only specific users to log in via SSH
You should not permit root logins via SSH, this is a big and unnecessary security risk. If an attacker gains root login for your system, he can do more damage than if he gains normal user login. Configure SSH server so that root user is not allowed to log in. Find the line that says:
PermitRootLogin yes
Change yes to no and restart the service. You can then log in with any defined user and switch to user root if you want to become a superuser.
It is wise to create a dummy local user with absolutely no rights on the system and use that user to login into SSH. That way no harm can be done if the user account is compromised. You can specify certain users who you want to have access by editing your sshd_config file.
At the end of sshd_config file I would add a line like this:
AllowUsers ron hannah jean
Allowing only specific hosts using tcp wrappers
You can allow only specific hosts on a network to be able to connect to your SSH service, but you don't want to use or mess up your iptables configuration. Instead, you can use TCP wrappers, in this case the sshd TCP wrapper.
By default TCP wrappers first look in the /etc/hosts.deny file to see what hosts are denied for what service. Next, TCP wrapper looks in /etc/hosts.allow file to see if there are any rules that would allow hosts to connect to a specific service. Edit your /etc/hosts.deny using your favorite editor. For me, I always use vi editor.
#vi /etc/hosts.deny
sshd: ALL
This means that by default all hosts are forbidden to access the SSH service. This needs to be here, otherwise all hosts would have access to the SSH service, since TCP wrappers first looks into hosts.deny file and if there is no rule regarding blocking SSH service, any host can connect.
Next, create a rule in /etc/hosts.allow to allow only specific hosts to use the SSH service. Let say, local subnet 192.168.1.0/24 or specific IP 192.100.1.2. Only hosts specified below can access the ssh service.
#vi /etc/hosts.allow then add:
sshd: 192.168.1 192.100.1.2
All other hosts are disconnected before they even get to the login prompt, and receive an error like this:
ssh_exchange_identification: Connection closed by remote host
@If you found this article informative, you may be interested on the black square window above related to this post. You can also leave comments or subscribe.
Wednesday, October 24
Tips for New Bloggers: Flash Music Player and Music Playlists
Tips for New Bloggers: Flash Music Player and Music Playlists
*this blogsite is one of the best tips and tutorials specially for new blog comers on its way.
*this blogsite is one of the best tips and tutorials specially for new blog comers on its way.
Tuesday, October 23
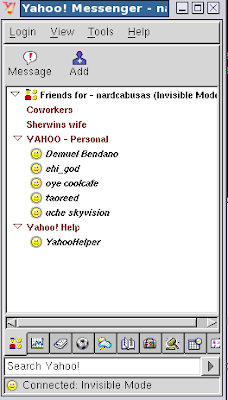
Howto: Installing Yahoo Messenger in Linux
RedHat Linux
- Save the appropriate file to your machine:
RedHat 9
- Log in as root and type: rpm -i
with the appropriate filename depending on your version to install the application. - Run /usr/bin/ymessenger from X Window to launch the application.
Debian Linux
- Save the file to your machine.
- Log in as root and type: dpkg -i ymessenger_1.0.4_1_i386.deb to install the application.
- Run /usr/bin/ymessenger from X Window to launch the application.
FreeBSD Installation
- Save the file to your machine.
- Log in as root and type: pkg_add fbsd4.ymessenger.tgz to install the application.
- Run /usr/bin/ymessenger from X Window to launch the application.
Installing aMSN Messenger Howto
 A very nice MSN compatible messenger application, aMSN Messenger is a multiplatform MSN messenger clone. Works pretty much like its Windows based counterpart. Perfect for keeping in touch with those friends who have not yet seen the light. Works on linux well.
Linux Installation Howto:
1. Download the software http://sourceforge.net/projects/amsn/
2. Untar the package
e.g sh amsn-0.97RC1-1.tcl84.x86.package
3. It will install all required dependecies like tcl, tk, tls, etc.. if error occured during installation, install the missing package using yu
 m command.
3.1 #yum install tcl
3.2 #yum install tk
3.3 #yum install tls
4. Upon completed, run the aMSN messenger from AppMenu > Internet > aMSN.
aMSN messenger can support webcam as well and other features
much like the windows messenger.
Wednesday, October 17
Fedora Linux Installation Howto
Fedora Installation (Screenshots)
1. To get started, insert the first installation CD (or the DVD), and power on the machine. Assuming your system boots normally, the first screen you should see contains a couple of installation options. You can install Fedora in either graphical mode, or in text mode. Text mode is useful if your having trouble working with the your system's graphics adapter.
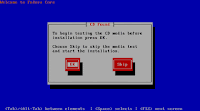
2.Regardless of which mode you choose for installation,the next screen is a text screen that asks if you want to test your CD media before you install. If you have new disc,skip this section and click next. This test makes sure the installer will be able to read everything
it needs to properly install.
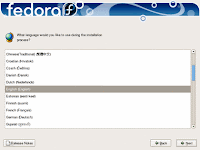
3. The graphical installation begins. Choose your language and click the Next button.
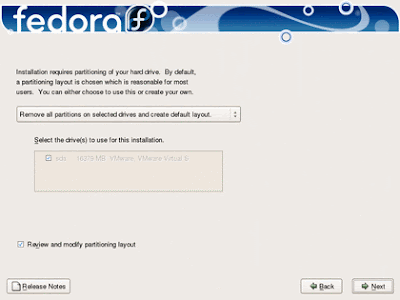
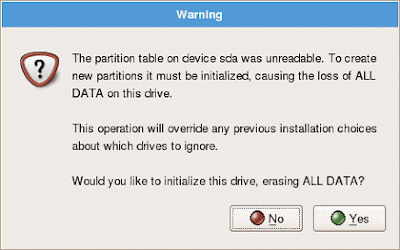
4.If you're using a new disk or want to format your hard disk. Answer Yes to initialize the disk. 5.Partitioning your drive, fedora provides a default layout which I have chosen for this installation. If you choose to remove partitions and create new ones, Anaconda pops up a warning that indicates that all data will be lost on the partitions you remove.
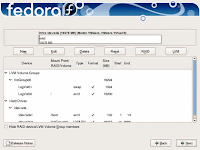
6. I've provided a screenshot that shows you the default disk layout for this operating system. In short,on this 16 GB disk, I have a 1 GB swap partition and a single 15 GB volume (named "/").
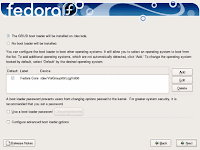
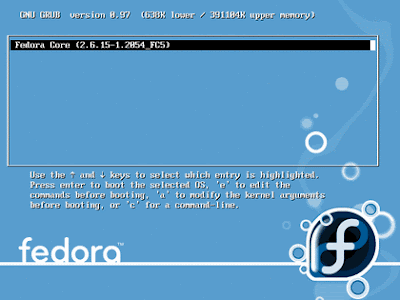
7. Use a boot loader for your new installation which is GRUB by default so that you can easily make changes the way your system boots especially in booting other operating systems if necessary.
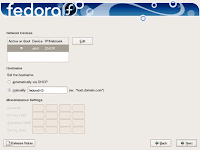
8. If you want to manually provide TCP/IP addressing information, click the Edit button to bring up the window on which you can provide an address, subnet mask, gateway and dns address.
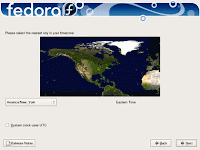
9. Select your time zone from the list.
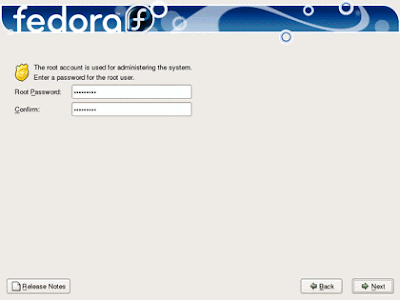
10.Provide the password for the "root" user.
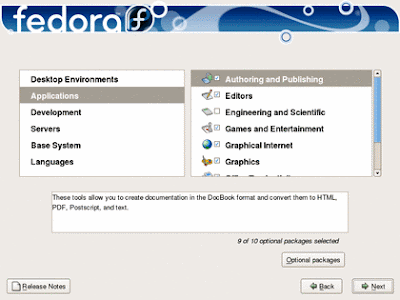
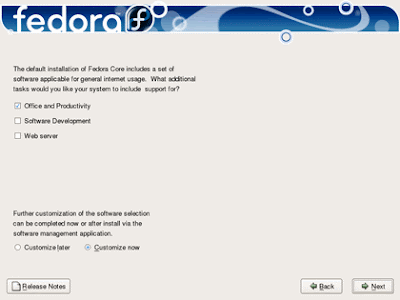
11.Choose what kind of software you want to make available on your new desktop system,for manual selection click "Customize now". This process can be done at any time, even after the initial installation of the system.
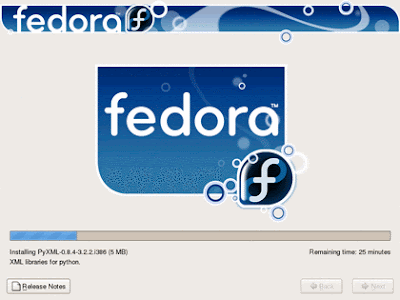
12. The formatting begins and immediately starts the process of installing the operating system and packages you've selected.
14. When installation done. Reboot the system and wait to boot GUI of your newly installed fedora. Good luck!
see screenshots below:
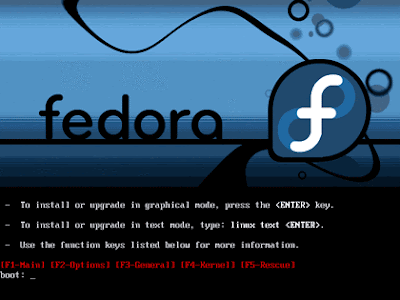
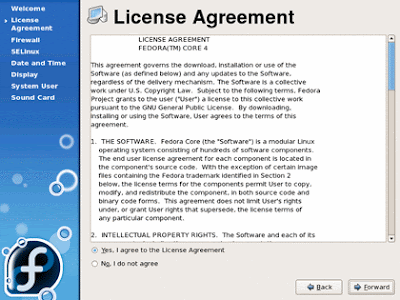
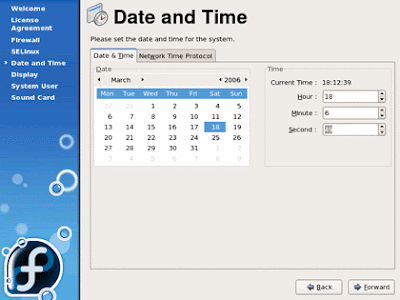
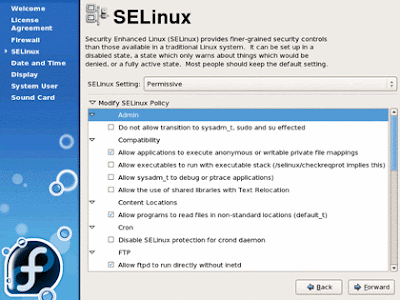
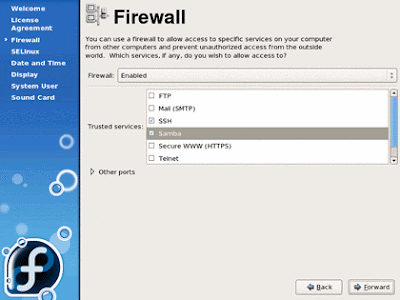
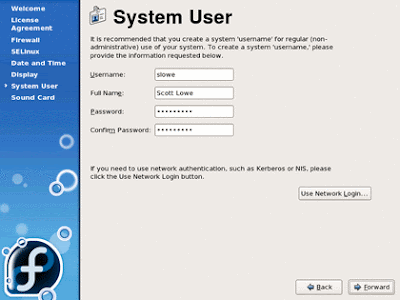
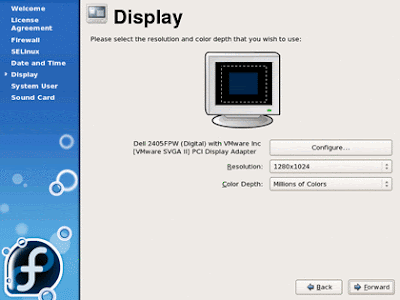
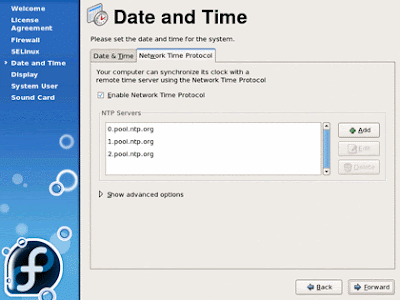
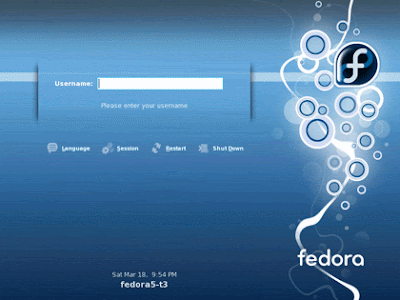
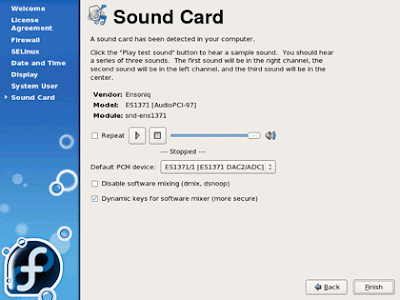
1. To get started, insert the first installation CD (or the DVD), and power on the machine. Assuming your system boots normally, the first screen you should see contains a couple of installation options. You can install Fedora in either graphical mode, or in text mode. Text mode is useful if your having trouble working with the your system's graphics adapter.
2.Regardless of which mode you choose for installation,the next screen is a text screen that asks if you want to test your CD media before you install. If you have new disc,skip this section and click next. This test makes sure the installer will be able to read everything
it needs to properly install.
3. The graphical installation begins. Choose your language and click the Next button.
4.If you're using a new disk or want to format your hard disk. Answer Yes to initialize the disk. 5.Partitioning your drive, fedora provides a default layout which I have chosen for this installation. If you choose to remove partitions and create new ones, Anaconda pops up a warning that indicates that all data will be lost on the partitions you remove.
6. I've provided a screenshot that shows you the default disk layout for this operating system. In short,on this 16 GB disk, I have a 1 GB swap partition and a single 15 GB volume (named "/").
7. Use a boot loader for your new installation which is GRUB by default so that you can easily make changes the way your system boots especially in booting other operating systems if necessary.
8. If you want to manually provide TCP/IP addressing information, click the Edit button to bring up the window on which you can provide an address, subnet mask, gateway and dns address.
9. Select your time zone from the list.
10.Provide the password for the "root" user.
11.Choose what kind of software you want to make available on your new desktop system,for manual selection click "Customize now". This process can be done at any time, even after the initial installation of the system.
12. The formatting begins and immediately starts the process of installing the operating system and packages you've selected.
14. When installation done. Reboot the system and wait to boot GUI of your newly installed fedora. Good luck!
see screenshots below:


RealPlayer on Linux
Download the current RealPLayer software for linux. http://www.real.com/linux/
To extract , run the following command. #sh realplayer10.bin
Install it using rpm command e.g. #rpm -ivh
If you encounter problem with libraries, install the missing library by downloading the library manually or by using yum.
e.g. #yum install compat-libstdc++-33 or rpm -ivh
If succesfull, play realplay by creating a shortcut icon or via application menu.
#realplay & or create a shortcut on your desktop
To extract , run the following command. #sh realplayer10.bin
Install it using rpm command e.g. #rpm -ivh
If you encounter problem with libraries, install the missing library by downloading the library manually or by using yum.
e.g. #yum install compat-libstdc++-33 or rpm -ivh
If succesfull, play realplay by creating a shortcut icon or via application menu.
#realplay & or create a shortcut on your desktop
Sunday, October 14
Installing Audio Player in Linux
XMMS is a multimedia player for unix systems. XMMS stands for X MultiMedia System and can play media files such as MP3, MOD's, WAV and others with the use of Input plugins. The easiest way to install xmms is by using yum (yellowdaog updter modified) command.
1. From your linux box type #yum install xmms xmms-mp3 xmms-skins
2. It will then fetch the xmms software from its repository database.
3. After installating, just run the software using command prompt
#xmms or #xmms & (play it on background)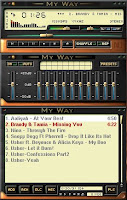
better yet click linux Applicationm (Menu) then go to Sound and Video > Audio Player.
4. Try playing any mp3 or audio song.
5. If mp3 files cant be played, make sure that the xmms-mp3 package was installed.
6. type #rpm -qa |grep xmms
7. yum install xmms-mp3* or install it manullay base on yourlinux distro.
8. See screenshoots after successful install.
Installing xmms-skins after succesfull install
1. Goto www.xmms.org
2. Select desired xmms skin and save it to your computer. Extension of skins are in .zip .
3.Then copy the downloaded skins to xmms default directory.
#copy /usr/share/xmms/Skins/
4.Change the skins by right click Menu > Options > Skin Browser
5.Then its done!
1. From your linux box type #yum install xmms xmms-mp3 xmms-skins
2. It will then fetch the xmms software from its repository database.
3. After installating, just run the software using command prompt
#xmms or #xmms & (play it on background)

better yet click linux Applicationm (Menu) then go to Sound and Video > Audio Player.
4. Try playing any mp3 or audio song.
5. If mp3 files cant be played, make sure that the xmms-mp3 package was installed.
6. type #rpm -qa |grep xmms
7. yum install xmms-mp3* or install it manullay base on yourlinux distro.
8. See screenshoots after successful install.
Installing xmms-skins after succesfull install
1. Goto www.xmms.org
2. Select desired xmms skin and save it to your computer. Extension of skins are in .zip .
3.Then copy the downloaded skins to xmms default directory.
#copy
4.Change the skins by right click Menu > Options > Skin Browser
5.Then its done!
Subscribe to:
Posts (Atom)